
Photographing with an Action Camera
First, lets get a few things out on the table in regards to shooting stills with an action style camera like the GoPro. As with any photography, the technical quality of the photo is 100% dependent on the camera taking the photo. Now, now, before everyone starts getting upset with that statement, let me say this: A professional photographer should be able to get a great photo from just about any camera. The reason why, a "professional" photographer understands the technical aspects of photography and the hardware limitation of most cameras, then use that experience to set & adjust to the optimum capabilities of that camera to capture a great photo. That's what makes them a professional photographer (not just getting paid).
The GoPro is no exception to this rule, but you need to remember that the GoPro is a very tiny action “video” camera with a very tiny sensor and a very tiny lens creating huge hardware limitations. It will in no way compete with a $5,000 DSLR with an equally expensive $5,000 lens attached. It’s not even going to compete with a $500 DSLR/Lens Kit. It’s just not going to happen! And by understanding these limitations, you can set acceptable expectations from the camera.
Post Note: When reviewing the photos below, click the first one in the list and watch the slide show. Also each has a comment specific to the photo so that you'll know what your seeing.
Learn the basics!
In this article, I am going to cover a few different aspects of shooting with a GoPro. The are focused on what I see wrong (and people asking for help with) from photos posted all over the internet, some of these just makes me cringe! Starting with the proverbial “ultra-wide angle” shots and then tossing in people for that portrait or selfie! But before we go there, here are four (4) things that all photographers and videographers need to know, even you:
- Learn about the Exposure Triangle (Shutter Speed/Aperture/ISO) Protune lets you modify these settings.
- Learn about Dynamic Range and a the Histogram. How having lots of shadows and bight sun in the same shot can be bad with small sensor cameras.
- Learn Composition: This is one of the most important aspects of storytelling. I give you a few tips in this post: https://www.theoutdoorlife.us/what-makes-a-snapshot-a-photograph/
- Learn to Edit! Even a pro photographer will try to set the camera & scene up so that they will get the best shot possible in-camera, but every pro will still edit their photos, and you’ll need to do the same!
You don’t have to be an expert at any of these things, but a general understanding of them all will help you tremendously in getting a great photograph.
Shoot & Edit in RAW
All digital cameras shoot in RAW (ones & zeros) but only some of them give you access to that RAW data. After the shot has been captured, then the camera process that RAW information to create the JPG image you typically see. Think of it like baking a Chocolate Cake, if you take all the raw ingredients (RAW data), follow a specific recipe (Algorithm) by combining them with specific amounts of each ingredient, in a specific order and then place them in a pan to bake (Save/Export) in the oven for a specific amount of time, you create the final product (Finished JPG Photo), your Chocolate Cake! Editing in this example is like adjusting your recipe.
So, what if your cake doesn’t tase just right and you want to add, say...more chocolate for a richer creamer taste. It’s a lot easier to change the recipe and bake another cake than trying to change the cake you already made. Sure, you can add some chocolate frosting to get a little more richer taste, but the actual cake itself is still the same.
Back to the photo; when you shoot a photo, the camera captures the data in RAW and process that information with its own recipe the way GoPro thinks it should be and THEN gives you a final JPG photo with those settings baked in. You can have some influence on that recipe by using Protune to tweak some the settings. If your editing the JPG file, then your making changes to a photo that’s already been baked! If you edit the RAW (GPR) file, then you have full control over the recipe that makes the decision on what the final photo is going to look like 100% in your hands! Who-rah for us!
Shooting in RAW with the GoPro 5/6 can only be done in the Wide Field of View and with Wide Dynamic Range (WDR) turned off. WDR is just another part of the recipe GoPro uses when saving the JPG. We don’t need or want WDR here, because we have control over the Dynamic Range when editing the RAW file. When you look at the files on your card, with RAW turned on, you’ll see files ending .GPR and .JPG.
When you edit the GPR file, you’ll have more latitude to make changes and produce a MUCH better photo. It's not just the Exposure and Contrast, but you'll have independent control over the White Balance, Tint, Highlights, Shadows, Whites, Blacks, Clarity, Vibrance, Saturation, Sharpening, Noise Reduction, Lens Correcting, and much more.
Take a look at this one (1) photo and you'll see the difference and power that is waiting for you to tap into.


Know How to Use Field of View
Field of View (FOV): A photograph can tell a thousand stories, but when using your GoPro to shoot stills, it is important to obtain the right filed of view for your composition. The GoPro 5/6 have the following Field of View (FOV) options: Wide (14mm), Linear (21mm), Medium (21mm), Narrow (28mm). The mm number is the lens equivalent on DSLRs. ie. a 28mm DSLR lens will roughly have the same FOV and GoPro’s Narrow setting.
In order to obtain a larger coverage of the image than would be available with standard FOV, you need a wider FOV. Action cameras like the typical ultra-wide “Fish-Eye” look and for good reason, it helps make the video “look” more stable and a lot less jerky. In still photography this is not really all that desirable. There are times when it has its uses, but for most situations - it’s just not a good fit! Wide Angle FOV will change the perspective in shift or tilt (horizontal or vertical direction) taking a wider frame area into the picture.
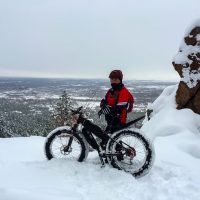
Relative to standard lens, a wide FOV has a shorter focal length and covers larger dimensions for the image frame and composition. By using the Wide FOV, the perspective gets stretched and objects that are closer to the camera appear to look bigger in the image, allowing you to fit in more detail, but at a cost. Objects that are closer to your camera will look enormous while those which are farther back nearly disappear in the shot. This perspective can be effectively used when photographing landscape scenes, flowers or trees etc. with satisfactory results, but when using the Wide FOV for people (or buildings), you must be careful that parts of the body such as head, hands, feet, noses (even breasts) etc. are not enlarged disproportionately. For example a child may appear with an enlarged head and the parents standing just a couple of feet behind may appear smaller than they actually are, your brain will have a hard time processing that. And for buildings, forget about it - everything will look goofy!
Lets take a look at the different Field of Views. These were shot in the exact same location.


Putting It All Together
So how do we get the best possible photo from the GoPro? That's a good question, and answered by putting all what we have learned above to use. First start by setting your GoPro to the Wide Mode, turn off Wide Dynamic Range and turn on GoPro Raw and go out and shoot. Yup, its that simple! Now edit! Personally I prefer Adobe Lightroom for all my photo editing. It's an extremely simple application to catalog and edit your photos. You can get 99% of all your editing done right from LR. It also comes with Lightroom Mobile and you can edit your photos from your mobile phone or tablet. I use an iPad to do most of my daily editing and when synced with Lightroom on your desktop all your edits will also sync. Again, too easy.
Lets look at the Wide FOV photos from above and see what we can do with it when working with the raw file.


Comparisons
In the following two galleries, click on the images and watch the slideshow switch between the two and you decide which is best. Each starts with the JPG Version show in-camera as GoPro saw it. then switched to the edited version.
FYI: The amount of dark shadows and bright sunlight in these example shots creates a very high amount of Dynamic Range (the difference between the brightest white and the darkest black) and tiny sensor cameras like the GoPro have a very difficult time getting in all the details. It's been my experience that the GoPro will side on the brights and there is more data in the brights than in the darks, but again, another reason for shooting in RAW.
Full Wide Angle FOV (JPG & GPR)

Narrow (JPG) FOV and Wide (GPR) FOV Cropped


So you say you use Lightroom on an iPad for most of your edits, so it will recognize GPR files?
Yes, both Lightroom Classic CC on the Desktop and Lightroom Mobile will edit GoPro Raw files, no problem.